Showing posts with label greens. Show all posts
Showing posts with label greens. Show all posts
Friday, October 17, 2014
Welcome, little green friend
When the little guy accidentally (we'll pretend) knocked over our plant a couple months ago, it was never the same. Dirt spilled all over the carpet and it seems our poor plant was traumatized, even after we tried to put it all back together. It had actually lasted quite a long time, and loved its sunny spot in the upstairs hallway. Really a poor parental decision I suppose to have left it precariously on a low bench in our bedroom but we'd had to move it out of the way for the painters. In any event, we found a lovely new plant - a variety I've never seen before - which has very cool tones of light and medium green, and delicate yet modern shaped leaves (fancy plant name: polypodium aureum). Now, we just have to plant him!
Oh, and you might notice the white subway tile and carrara - YES we finally gave that temporary chalkboard backsplash and black hole of a counter top (it was Uba Tuba granite if you are familiar) the boot! We hope to have some before and afters posted soon :)
Friday, March 1, 2013
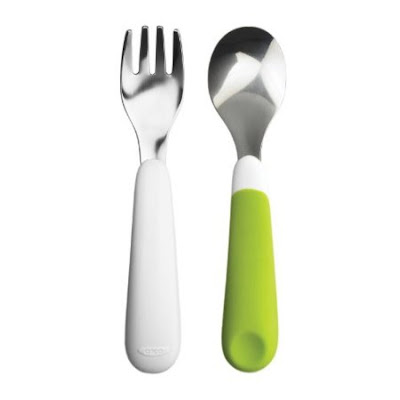
Oxo Tot
We are big fans of Oxo Tot, Oxo's line dedicated to little ones as they learn to use utensils and bowls and what not. Their product line is not cutesy or over-embellished; rather it's modern and sleek, while still feeling playful and fun. We have all of these items, except for the booster (I just think it's so well designed, and have a feeling we'll be ordering it in soon enough). The Oxo Tot product line definitely stands out among all the other brands from an aesthetic perspective, and I love to give praise to the companies that "get" the appeal of style and simplicity in product design for kids' stuff. Well done!
Tuesday, February 19, 2013
Air plants
I am so fascinated by air plants. We saw some at our favorite garden shop the other day and I bombarded a very patient sales person with questions (I couldn't help myself). Do they really not need water? How do you care for them? How long do they "last"? Do they grow? Where did these come from anyway? So here's the scoop. Yes, they do need water, but only in the form of a 20-30 minute soak in water (submerged) every couple weeks. Then you drain them (upside down to prevent rot) for another 20-30 minutes and back they go into their containers or trays or what have you, happy as clams. They "last" the same as any other plant, I suppose as long as they get proper care. They do grow! And some even flower. They are not new, though it seems that way. Apparently they were popular in the 70s (Aha!) and making a bit of a resurgence. I keep thinking about them.. so lovely for decorating. Living greens that are modern, and low maintenance... Perfect for a Modern Cottage!
Labels:
garden and outdoors,
greens,
modern cottages
Monday, November 26, 2012
Holiday project #1: Fun with Paperwhites
So we're hoping to tackle a handful of decorating projects this Christmas. So far, so good with the first two (yes, we've tackled TWO so far!) I've always loved paperwhites and with a little research discovered they're quite simple to "grow" indoors. We purchased a few bulbs from our local nursery and set them up in individual canning jars with some rocks we collected from the beach just down the hill from our house. Ideally you stick a bunch of bulbs together in the same container so they grow in a nice, full, bunch. However I had this notion of setting them up in the jars, and there isn't much room. We'll see how we do. It's an experiment. I just adore the jar trio though. We got them all assembled mid-month, so they should be blooming around the middle of December. Can you believe we were that organized? :)
Labels:
beach style,
decorative accessories,
fall and winter,
glass,
greens,
holiday
Tuesday, August 14, 2012
Moss art
My jaw dropped open when I saw these in the latest Viva Terra catalog. Well, first I thought, "Oh, wow, they're selling versions of the little craft project husband and I did a few years ago... how funny!" And then I saw what they were charging... $200-500?! That's when my jaw dropped open. I couldn't wait to tell the husband their price for reindeer moss and hot glue (well, that's what we used) in a frame (we used a canvas ... but you could so easily use a frame and remove the glass!). Anyway... if you like the look, I highly encourage you to make your own, it only took us about ten minutes.
Here's our version as seen in some earlier posts:
First, as a little chartreuse pop above the guest bed in our last house.
We do have a thing for green, but like to avoid anything faux as much as possible... this is why we really love the reindeer moss - real + zero watering is a good thing. And our piece cost less than $30 :)
Here's our version as seen in some earlier posts:
First, as a little chartreuse pop above the guest bed in our last house.
And now as a hit of green at my workspace in our current house.
We do have a thing for green, but like to avoid anything faux as much as possible... this is why we really love the reindeer moss - real + zero watering is a good thing. And our piece cost less than $30 :)
Monday, July 9, 2012
Modern Cottage mailbox
Love at first sight. To make it perfectly Modern Cottage, I'd paint the flag pale blue or white. Can you imagine??
Labels:
color,
garden and outdoors,
greens,
porches
Wednesday, June 20, 2012
Happy workspace
Tuesday, May 29, 2012
Modern Cottage picnic
It's been ages since we went on a picnic, but this past Mother's Day, we did just that! It was a gorgeous sunny day and so nice to just relax on a blanket by the lake with some yummy snacks.
It got me wanting to have more picnic afternoons, and these items would be so perfect...
From top: Martha Stewart melamine dishware, waterproof blanket from Etsy, cooler and flatware from Crate and Barrel, and a tasty-looking turkey caprese sandwich recipe also from Martha. Now I just need to hunt down a great beach umbrella!
Labels:
beach style,
color,
garden and outdoors,
greens,
spring and summer
Thursday, April 12, 2012
Springtime indoors
Labels:
antiques and vintage,
color,
decorative accessories,
greens,
industrial,
metals
Sunday, April 8, 2012
Easter egg experiment
We got yellow eggs using tumeric; blue eggs using red cabbage; and gorgeous green eggs by mixing a separate dish with part of the yellow/tumeric mixture and part of the blue/cabbage mixture (it turned an odd dark orange in the dish, but the eggs still dyed green). They all came out a little different, some with spots, some pale and uniform.
I was certain the cabbage dye was going to turn the eggs purple, but indeed they dried blue!
I think they are stunningly beautiful (as far as Easter eggs go :) and now we are super excited to color eggs this way each year.
And here is the little pail our guy used for his first ever egg hunt... (assisted by Dad, of course :)
Happy Easter!
Labels:
baby and kids,
blues,
color,
greens,
holiday,
spring and summer
Friday, January 27, 2012
Modern Cottage Mobile
We really wanted something minimalistic yet beautiful and interesting for baby's mobile. It's been quite a challenge hunting down baby items that are simple and stylish. I knew from the moment I discovered this photo mobile I was on to something good - clean, modern lines and grippy little clips which allow total customization! We considered black and white family photos but with the photo wall we planned to create above the changing "cart" I was worried this would feel too photo-heavy and overall too busy. Enter these super cool bright green grassy looking spheres (yes, that's their official name :) that I purchased at Molbak's, one of our favorite garden stores. They have a huge gifts and housewares section and these cheerful little guys were sold in packs of six. The mobile's grippy clips grasped their spiky plastic blades securely, resulting in a modern, playful mobile that added the perfect hit of green to go with Scout's silhouette and the green glass vessels on top of the armoire.
(Photos by Kristine Sitko)
Labels:
baby and kids,
color,
decorative accessories,
greens,
industrial,
metals,
mod appeal
Monday, July 11, 2011
Hello, hydrangeas!
Our fabulous hydrangeas are in full swing now (you may recall how they looked a few months ago in this post). They just go more and more crazy each summer! As you can see, they are getting a little up close and personal with our outdoor table, but I am not sure what to do about it just yet...they're so pretty.
And this I couldn't resist... my favorite calendar's July illustration is identical to our happy-go-lucky hydrangeas. Love it.
Labels:
garden and outdoors,
greens,
spring and summer
Monday, June 13, 2011
Punchy doors
We decided to keep two of the existing exterior doors ... one being this lighted door (because I thought with some sanding and a fresh coat, it could be quite charming) and the other being the garage door (because I knew we could tie them together with paint, and it's a fire door). The color turned out perfectly! It adds loads of personality and makes the whole place feel a lot more modern and stylish then plain white doors would. You may recall the outdoor sconces from this post ... yes, we planned to use them indoors from the get go, and they add such amazing modern ambiance and interest. The oversized look is perfect for this space, and throughout the rest of the room (more to come on that). Well-played, sconces! By the way, here is what these doors looked like before:
Labels:
color,
greens,
modern cottages
Monday, April 4, 2011
Fun with paper
Saw this done recently (with humans :) and decided the other day what a delight it would be to honor Scout this way - a dog silhouette! It was ridiculously simple. I already had the frame, so we just ventured to the craft store to pick out some colorful card stock papers. Of course Scout had to pose in profile (he is quite good in front of the camera, has been since he was a pup), his reward being a couple of peeled baby carrots. Then I cropped and sized the photo appropriately for the 8x10 opening of the frame and printed it out:
Next we chose the paper...it's so inexpensive, we brought home a few options knowing we'd find a use for what was left soon enough.
Then we simply (and haphazardly - I was anxious to get to the end result) taped the two together and I cut out along Scout's profile. I taped the left edge and bottom edge flush so I only had to cut the other two sides.
I then mounted the resulting paper cut out onto a piece of white cardstock to fill up the rest of the 8x10 opening. And voila! Cutest profile ever. And it really does look just like him, from the tiny bump on his head to the nose. Talk about instant gratification!

Labels:
art,
color,
greens,
mod appeal,
modern crafting,
scout
Subscribe to:
Posts (Atom)


